Working on some Christmas projects right now. I will post later so as not to ruin the surprise for anyone.
Also, I have a new idea for a series of paintings that will appeal to the nerdy art lovers out there.
When I get a spare moment!!
Saturday, October 23, 2010
Friday, September 17, 2010
Galleria degli Uffizi
Out of all the amazing artwork showcased at the Uffizi Gallery in Florence, a small little portrait I'd never seen by an artist I'd never heard of was my favorite piece.
 I stared at this piece as long as the circulating crowd would let me. It's a portrait of Sir Richard Southwell painted in 1563 by Hans Holbein the younger.
What's amazing to me about this portrait is how realistic it is. A lot of renaissance paintings contain idealized figures and faces. I love Boticelli, and was totally estactic to see his paintings up close, but I never look at his painting and think; that scene could be real, those people could be real. All his figures look strikingly similar anyway. His work has those trademark angelic faces.
What's remarkable to me, is that I literally had to get my nose up to the glass before I could see brush marks. Before I could even tell it was a painting and not a photograph applied to wood. This photo betrays the sheen of the oil paint, (you can see it in the black robe in the lower left corner) but it makes it look washed out, when in reality it is still a very vibrant portrait. The translucency of the skin and of the hands and face is astonishing. He looks alive. He looks like he could move any second. He looks like someone I could meet on the street.
Normally my stand by philosophy is let photographs look like photographs and let paintings look like paintings. But, I couldn't help but be stunned by such a photo-realistic painting completed at a time of idealized figures and faces, and 450 years ago at that.
I also was reacquainted with and newly impressed with this guy.
 Fillipino Lippi.
Actually nearly all the religious painting from the renaissance are way more impressive in person. Namely because most of them are HUGE. Like the size of a large wall. This is obvious, as they were orginally intended to go inside HUGE gothic churches. But it's easy to forget when you've spent your whole life looking at tiny thumbnails in history books.
Contrariwise, there were a few itsy bitsy gems that impressed because of their detail and tiny size.
 This one, for example, by Piero di Cosimo, couldn't have been any larger than the monitor I'm looking at now. Although the level of detail is incredible.
Truly a once in a lifetime experience. I'm jealous of those who live near enough to go as often as they wish. I am so amazed with the creativity of the human spirit, and I marvel at how much these painters could accomplish in their lifetimes. Such beauty!
Friday, September 3, 2010
Change
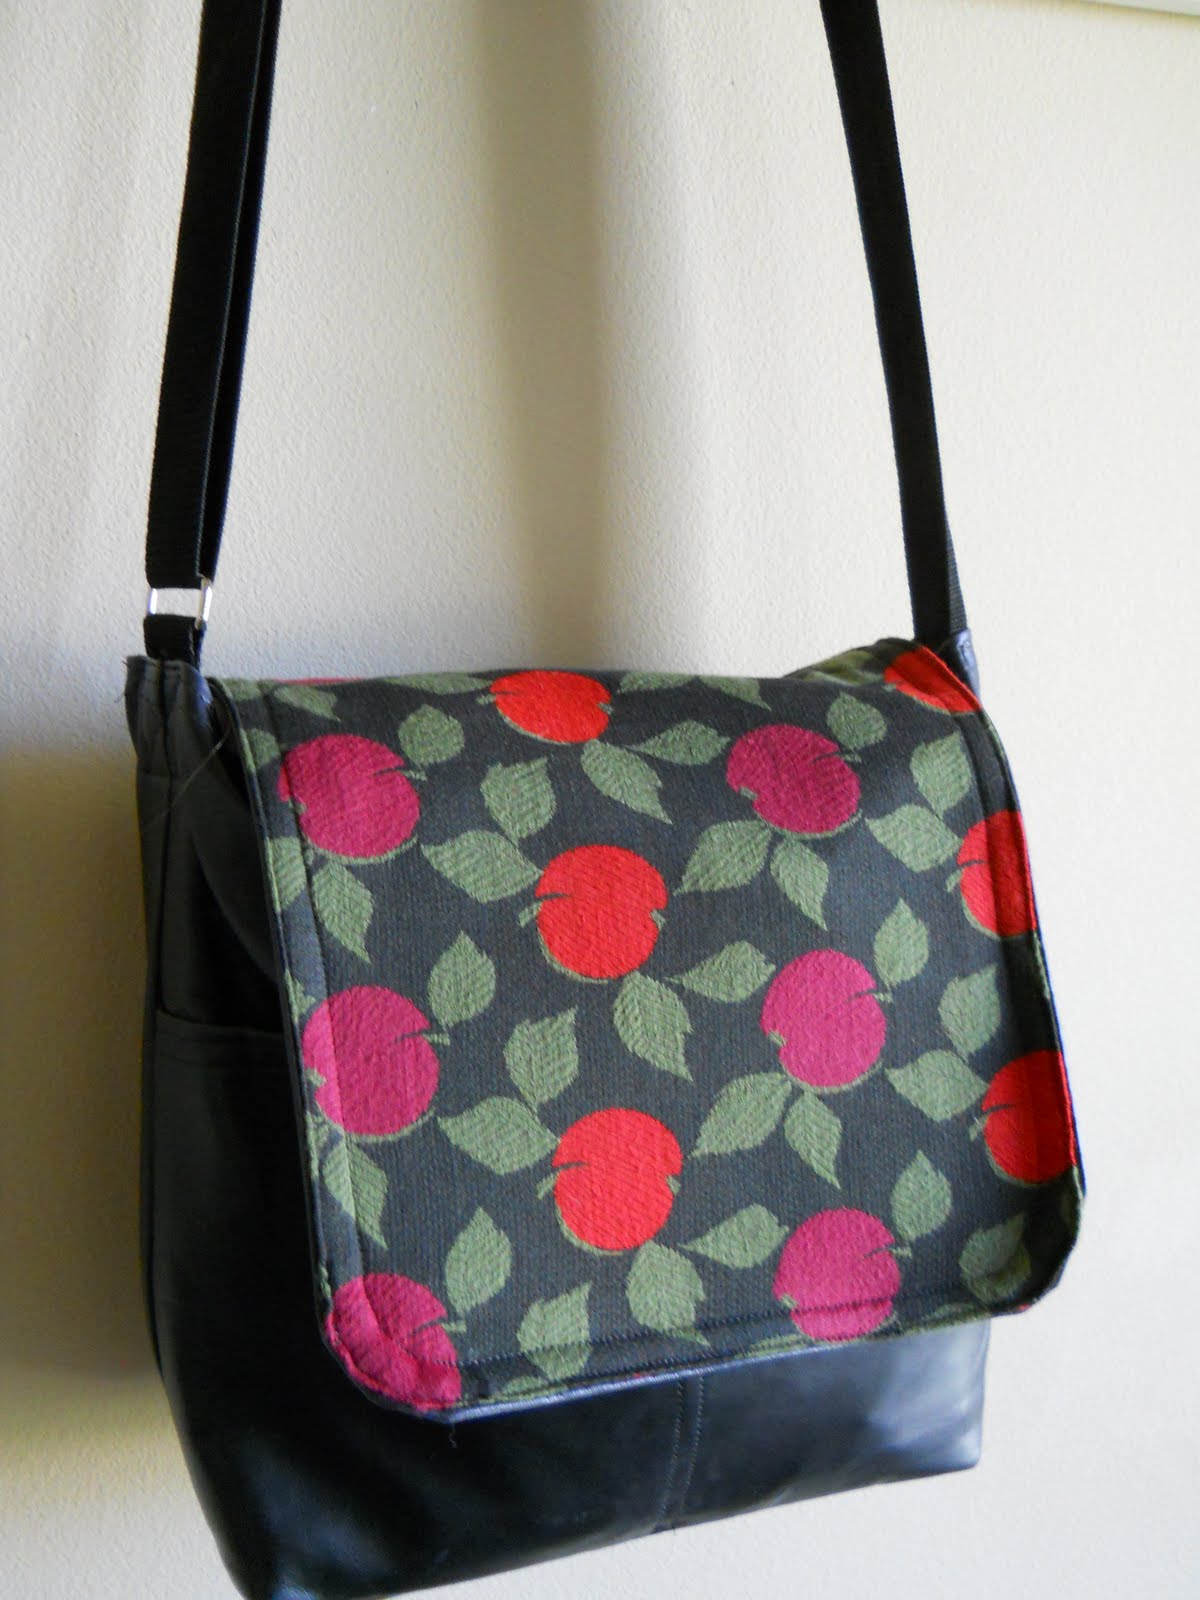
I decided I didn't like the look of my messenger bags as well as I used to.
I changed them up with some vintage/decorative fabric.
I changed them up with some vintage/decorative fabric.
Tuesday, August 31, 2010


Friday, August 27, 2010
Purse Painting Mash-up
When I started making these bags a couple years ago, my original intent was to sew real, original miniature paintings onto the front. However, sewing is not my cup of tea. I enjoy the end result, but definitely NOT the process. It's the opposite with art; I heartily enjoy the process and usually end up ignoring the end result.
I almost always forget to sign my paintings. Once it's done, I just don't care anymore. I think I really just wanted to see what the painting was going to be, like reading a story to find out what happens.
Anyway, here is what happens when you mix a purse with a painting.


I almost always forget to sign my paintings. Once it's done, I just don't care anymore. I think I really just wanted to see what the painting was going to be, like reading a story to find out what happens.
Anyway, here is what happens when you mix a purse with a painting.


Monday, August 23, 2010
Three more ink drawings resined
Here is the piece from the tutorial. It's still not completely cured, but it can be moved around.
 Here are two more pieces that I resined at the same time.


 Here are two more pieces that I resined at the same time.


Sunday, August 22, 2010
Epoxy Resin
So it's actually *epoxy* resin. I've been saying poly resin which is different stuff, apparently.
Here is the painting I want to epoxy resin. It's ink on bristol board.
The painting was sprayed with Krylon UV resistant clear acrylic coating, (no photo) and allowed to dry.


A layer goes on the canvas and on the back of the painting.
 I used this handy dandy tool to smooth the painting onto the canvas. I think I used it originally in a print-making class many years ago. I don't remember what it's called or where to get it. A plastic putty knife would work just as well. I will use that later for the resin.
 I smoothed the front and the backside of the canvas.

Here is the painting I want to epoxy resin. It's ink on bristol board.
The painting was sprayed with Krylon UV resistant clear acrylic coating, (no photo) and allowed to dry.
 Next, I painted the edges and sides of a 12 x 12 box canvas black (the chosen border color). Once the canvas was dry, I used Golden brand gel gloss medium to fix the painting to the canvas.

A layer goes on the canvas and on the back of the painting.
 I used this handy dandy tool to smooth the painting onto the canvas. I think I used it originally in a print-making class many years ago. I don't remember what it's called or where to get it. A plastic putty knife would work just as well. I will use that later for the resin.
 I smoothed the front and the backside of the canvas.
Then I put a heavy pile of books on top of the upside down canvas, so that the painting will dry very flat.
 So, here's the cast of characters for the next part: epoxy resin (it comes in two parts the resin, and the hardener), a disposable stirring spoon and bowl, protective gloves, and the putty knife (not pictured).
 Also, make sure the place you are working is well ventilated. Epoxy resin doesn't really have a strong odor, but it still isn't safe to breathe. It's too humid to work outside now so my system is a fan on the resined pieces pointing towards a fan that is in the window.
 Also, wear a mask. AND if you have long hair, tie it up.
 Mix equal parts resin and hardener. This is important. If the ratio isn't 1:1 the resin won't harden right. Mix thoroughly.
 Pour it on the piece. Be careful not to resin your piece to the floor. Resin will bind just about anything together. I once had to knock a piece off my basement floor with a hammer and screw-driver.
 Spread it around making sure everything is covered. I also used the mixing spoon or a disposable paint brush to smooth the resin around the edges of the box.
 Every 10 minutes or so, use a blow dryer to pop any bubbles that form on the surface. If you skip this step, your piece will have permanent micro-bubbles.
 Let it dry. It will be hard to the touch in about 8 hours. Make sure no one disturbs it during the time. If the place it's drying isn't exactly pristine (like a garage maybe), you might need to protect your piece from dust or bugs with a carboard box.
 It will be completely cured in maybe 3 days. Resin self levels, so there is no need to fuss over it, with the exception of the micro-bubbles.
Monday, August 16, 2010
Second Resin attempt
I'm in the process of putting all my old ink drawings on canvas or wood and applying a layer of resin. This is a convenient way to finish them. They are ready for display as soon as the layer of resin is hard.
I had never really wanted to place all these drawings under glass and in frames. It seemed kind of stuffy to me, adding such a hard barrier between the drawings and the viewer. They're meant to be looked at closely. There is a lot of detail.
Resin has the advantages of being permanent, cheaper than traditional frames, and giving the viewer the feeling of more immediate access to the work.
Here is the latest resined piece:
 12x16 drawing on 16x20 canvas
 Additionallly, these resined pieces could still be framed if someone wished. They don't need glass, as the resin acts as a sturdy barrier against the elements and oily fingers.
As with any painting, resined pieces should still be protected from sunlight.
My next post, hopefully, will be a play by play of the process, using this piece:

Saturday, August 14, 2010
Ink drawing Poly Resined on Canvas
This project started off as an ink drawing on watercolor paper.
I sprayed the drawing with a matte glaze to fix the inks, then I used gel gloss medium to glue the drawing to a prepped canvas. When all was dry, I poured poly resin over the whole.
Lessons learned:
1. apply several coats of fixative. The poly resin still picked up a slight orange color from the ink.
2. make sure the corners of the drawing are firmly glued down BEFORE pouring the poly resin. I was lazy and thought the poly resin would glue them down better. Not. They still curled up slightly despite the resin. I'll need to go back and fix that.

3. Photograph the work BEFORE finishing with the resin.
As you can see from this photo, the resin is very shiny, making it hard to photograph the work and get a good representation. The colors are much more saturated than shown here, and a lot of detail (especially in the corners) is washed out.

8x10
Friday, August 13, 2010
Old work made new and a Commission
These were painted in 2005. They had been in storage until 2009. When we moved I decided to hang them in the house, and they have been exposed to sunlight during that time, but haven't faded noticeably. I varnished them today with one coat of permanent Liquitex Gloss Varish. The varnish retains a wet look after drying, which causes the paint to look as saturated as it did when first applied.
 23.75" x 48.5"
30x35
This painting was an experiment with acrylic, watercolor pencils, and ink on wood. I sprayed the final painting with a fixative to prevent the ink from bleeding, and then I applied a layer of poly resin. The resin gives the painting a thick glass like coating. I really like the effect.
 24x25
24x25
This painting was done in ink and acrylic and various texturing mediums, sealed with a coat of Gloss Varnish.
 36x48
36x48
Subscribe to:
Comments (Atom)